GalliumOS on an Acer P720 Chromebook
How to completely remove ChromeOS and install Linux GalliumOS
I was recently given an Acer C720 Chromebook. It’s a generic-looking little laptop with 2G of RAM, an Intel Celeron 2955U 1.4 GHz CPU and 16G of Solid State storage. Not the top of the line by a far cry, but I imagine that it ran ChromeOS fairly well back in 2013 when it was released.
First thing I did was research how to permanently remove ChromeOS and install Linux on it.
Why?
Why not? It’s in my nature. When my wife complains that I’m ‘fixing’ something that works I respond: “Well, if it works, it can work better. Right?”.
ChromeOS does not appeal to me, I do not like having all my data shared with, and read by Google. Also, it would be a good opportunity to learn about Linux. And finally, I plan to use this little laptop to teach myself Python and SQL.
GalliumOS
I tried several flavors of Ubuntu and all of them had some kind of problem. Doing some research I came across GalliumOS. It is an optimized OS for Chromebooks and it works really well! You can read about it on the project’s wiki
How?
Here are the steps required to be able to boot and install Linux GalliumOS.
- Create GalliumOS USB installation media.
- Do a backup of your data. (Optional)
- Create a recovery image of ChromeOS.
- Remove the write-protect screw.
- Enable Developer mode and Legacy boot.
- Flash a third party firmware.
- Install GalliumOS.
Note that when you need to connect a USB drive to the chromebook, you need to use the USB2 port (the one on the right side). This is because SeaBIOS and EFI only support booting up from USB2 ports only. Let’s go one by one.
Creating the GalliumOS USB installation media
Go to the GalliumOS download page and download the appropriate image, in this case Haswell. To write the image to USB media use the following command:
dd bs=4194304 of=/dev/*the sd? dev for the USB HD* if=galliumos_image_file.bin conv=sync
Backup your Data
Well, just back-up your data. I have never used ChromeOS, but I imagine you can save your data to USB media. It is also possible to download your data from Google’s servers later. So, maybe no need to back-up.
Recovery Image
According to several guides that I found online this is what you do:
- Log into the Chromebook and let it auto update, as there sometimes are firmware updates. Check the updating status in the browser at chrome://help
- Insert the USB stick, enter
chrome://imageburnerand follow the directions to generate a recovery image
That didn’t work for me. I tried using the tool that Google makes available for MacOS, but that only works with flash sticks and not USB hard drives. In the end, I had to download the Linux version of said tool, execute it, select the model of the Chromebook and retrieve the image from the temporary folder once it finished downloading. Then, to burn it, I used following command:
dd bs=4194304 of=/dev/*the sd? dev for the USB HD* if=chromeos_image_file.bin conv=sync
Removing the write-protect screw.
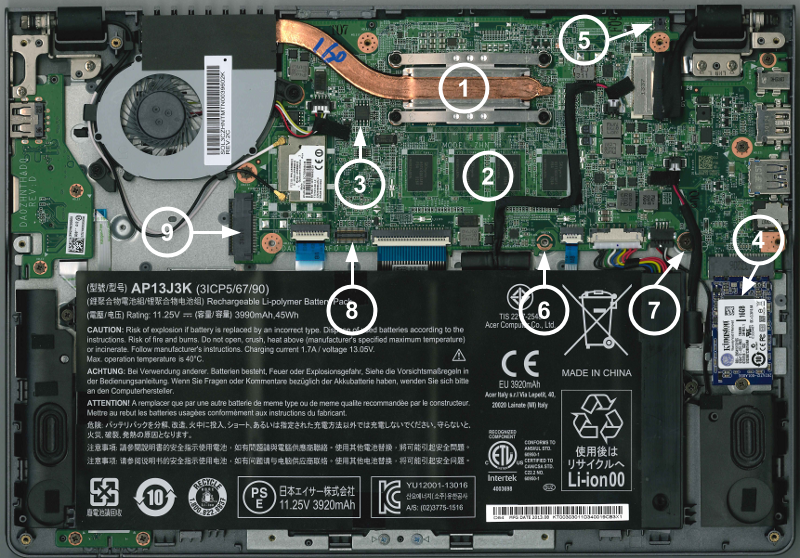
WARNING: This will wipe out whatever is installed on the SSD. Removing this screw will allow to overwrite the firmware with a better version than the stock one. Turn the device off and flip it over. Remove the 13 screws securing the bottom cover (there is one screw under the warranty stick). Pry the bottom cover off, starting from the side with the screen hinges. Once the logic board is exposed remove the write-protect screw (screw number 7 on the image below). Replace the bottom cover.

After turning on the Chromebook it will complain that the OS needs to be restored. Use the restore image created on the previous step and follow the on-screen instructions to restore the system.
Enabling Developer mode and Legacy boot
Developer mode and Legacy boot need to be enabled to be able to boot an OS other than ChromeOS via USB.
After restoring the OS, turn the Chromebook off and follow these steps
- With the Chromebook off, press down ESC+F3 (Refresh) keys and power on the device.
- Invoke Recovery. At the Recovery screen press Ctrl+D.
- It will prompt for confirmation, press ENTER to reboot into developer mode.
- At the white boot screen press Ctrl+D to continue boot
- Open a shell window by pressing Ctrl+Alt+T. Set dev_boot_usb and dev_boot_legacy to active:
$ sudo crossystem dev_boot_usb=1
$ sudo crossystem dev_boot_legacy=1 - Insert the USB stick with the GalliumOS image and reboot the Chromebook.
- At the boot screen press CTRL+L to enter legacy boot mode.
Flashing a third party firmware
Replacing the stock firmware has several advantages, for one, being able to boot into Linux without ever seeing the Google logo or scary looking menus ever again. To read more about the custom firmware and all it’s properties goto mrchromebox.tech website.
After using the GalliumOS installation media to boot into a live OS, open a new terminal window and type:
cd; curl -LO https://mrchromebox.tech/firmware-util.sh && sudo bash firmware-util.sh
Select option 3) Install/Update Full ROM Firmware when prompted.
When the process is done, reboot the chromebook. If there is a black screen that says ‘shell’ just type ‘exit’ to get back to the the UEFI settings menu. From there you can select your boot device or reboot.
Installing GalliumOS
This one is easy, connect the GalliumOS installation media to the USB port and restart the chromebook. You will be bboting up to the live OS. From there you can run the Install application. That’s it.
So, how is it working?
Surprisingly well for a 4-year-old machine with a Celeron CPU and 2G of RAM!